Dell Optiplex XE2/9020/7020 Libreboot + OpenBSD Guide
Introduction

If you have read some of the articles on my website under articles/t/
you may have read that I own a Dell Optiplex XE2 SFF that I Librebooted quite some
time ago. This has been my main computer for a long time running Libreboot +
NetBSD 10 but I was never truly content running an unencrypted NetBSD system
on a machine with so much potential.
This is not to say NetBSD is bad, but it has it's problems, and not being
able to perform full disk encryption (easily) is one of them. There were
other issues too, mainly performance or hardware compatibility issues that
bugged me for ages, and the whole time I was just holding out until I
managed to get OpenBSD to work on the machine.
The reason I could not boot OpenBSD on this machine was because the
live USB environment would not recognise my hard drives. I have had this
issue before on non Libreboot computers and it is normally fixed by
disabling any RAID configurations that may have been set in the BIOS.
Im not sure if this was the cause of the issue on Libreboot, but nonetheless
OpenBSD would not install.
Anyway I was inspired to try again after reading through a thread that
mentioned this same issue that on the Dell Optiplex XE2/9020/7020 Libreboot
version OpenBSD would not install but after updating to Libreboot 25.06
it would install.
Here we go again!
In the rest of this page I will document how I went about installing
Libreboot 25.06 on my Dell Optiplex XE2 SFF, plus installing OpenBSD
with full disk encryption. If you are new to Librebooting, dont worry
as it is quite straight forward, but the Libreboot documentation can
be very spread out and hard to follow, I aim to keep this as simple as
possible so you avoid spending hours trying to figure out what to do.
However, do not take this page as gospel, refer to the official Libreboot website also
to double check that I am not talking shit. This is just a rough guide of how I managed
to install Libreboot on my Optiplex, your mileage may vary.
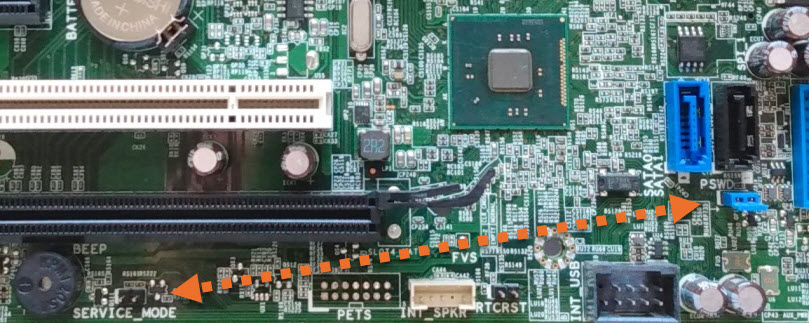
Entering Service Mode On Vendor BIOS
In this guide I will be interally flashing Libreboot onto my Optiplex.
If you are using the vendor Dell BIOS, you must enter service mode. Entering
service mode can be achieved by moving a jumper from 2 pins labelled PSWD
to 2 pins labelled SERVICE_MODE
Once you have done this, when you turn the machine on it should indicate
to you that you are in service mode. For the duration of this procedure
you should keep the Optiplex in service mode. If you are flashing another
version of Libreboot from an Optiplex that has already been Librebooted
you do not need to do this.
Setting Up The Build Environment
Firstly, we must get the software needed to flash Libreboot onto our motherboard,
I would advise that you use an external SSD/HDD that you dont really care about
hooked up to the Optiplex, instead of using your main drive and operating system.
The operating system I am going to use is Debian, this is because the
Libreboot build system (lmbk) has a script to install all the dependancies
for Debian, saving a headache trying to install all the dependancies manually.
Also, Libreboot can be very Linux-centric and I find it is easier just to
use a "just werks" sort of Linux OS when doing something like this.
Once you have installed Debian on your Optiplex we must aquire the Libreboot
build system, lmbk.
Install git, sudo apt-get install git, and run the following command:
git clone https://codeberg.org/libreboot/lbmk
From here we must do some setting up, firstly we should set the amount
of threads for lmbk to use when compiling Libreboot roms, I have an 8
thread CPU so I will be using all 8 threads to save time.
export XBMK_THREADS=8
If you have just installed Debian like I have, you wont have set up
anything in git, so we must do some basic git configuration as follows:
git config --global user.name "John Doe"
git config --global user.email johndoe@example.com
Now we need to install the dependancies needed in order to compile
Libreboot roms. Since we are on Debian we are able to use a script
provided in lmbk as follows:
./mk dependencies debian
Now we have set up the build environment, and are ready to compile
the Libreboot roms that we will flash to our motherboard.
Source
Compiling The Libreboot ROMS
Compiling the Libreboot roms can take a while and requires an internet
connection so make sure that you have got internet! But it is as simple
as finding out what rom we want to build (or you can build all of them
if you want to) and using lmbk to buld it.
Since I am making this guide for the XE2/9020/7020 SFF Optiplex's I will
be building the dell9020sff_nri_12mb rom. The instructions
are virtualty the same for the MT versions but instead you would build
the dell9020mt_nri_12mb rom.
If you have a 7020/XE2 dont worry the 9020 rom will work with both motherboards.
To compile the Libreboot rom run the following command:
./mk -b coreboot dell9020sff_nri_12mb
Of course, replacing dell9020sff_nri_12mb with whatever
rom you wish to build.
This could take a while, and if you get some errors relating to permissions
I found that running various chown commands fixed them i.e sudo chown myuser whatever_problematic_file or sudo chown myuser ./*/*/*/*/*.
Once completed, you should have a new directory in your lmbk directory
called bin which will contain all of the roms that you have
just compiled.
I would highly recommend familarising yourself with what each rom does
as depending on what OS you wish to put on the machine depends on the
rom you will use. Dont worry too much though as if you flash the wrong
rom you can always just flash another later.
Since I am going to be using OpenBSD on my machine I am going to be using
the seabios + txtmode rom seabios_dell9020sff_nri_12mb_libgfxinit_txtmode.rom.
This is because OpenBSD does not really like being booted from grub, I would only
use grub if you are going to using conventional Linux distros such as Debian on
your Optiplex.
Source 1
Source 2
Flashing Libreboot
Firstly, we are going to want to reboot Linux with relaxed memory parameters.
To do this we must edit /etc/default/grub, and change the
line GRUB_CMDLINE_LINUX_DEFAULT="quiet splash" to GRUB_CMDLINE_LINUX_DEFAULT="iomem=relaxed quiet splash".
Save the file, exit, update grub:
sudo update-grub
and reboot.
Before we flash any roms we must make sure that we get a reliable read
from the BIOS chip, otherwise we could end up with a bricked machine.
First we will check if we can read from the chip by running:
flashprog -p internal
If there were no errors, then you are safe to proceed.
Now its advised that you make multiple dumps of the current BIOS chip
contents and make sure that they are all the same using diff. To dump
the current contents do:
sudo flashprog -p internal:laptop=force_I_want_a_brick,boardmismatch=force -r dump.bin
Assuming there were no differences with your dumps, we can proceed to the
final steps. Next we are going to flash Libreboot using this command:
sudo flashprog -p internal:laptop=force_I_want_a_brick,boardmismatch=force -w seabios_dell9020sff_nri_12mb_libgfxinit_txtmode.rom
Once that has completed successfully, if you are flashing from the vendor
Dell BIOS, remove the power cable from the back, DONT shutdown the machine
from the operating system or from the power button, PULL THE PLUG! This is
because EFI variables can still be written from the vendor BIOS and that
would fuck us.
Leave the power out for a few minutes, just to let things settle, im not
sure if this actually does anything but it feels right. Once you have
waited, the moment of truth lies ahead, does it boot? Well it should do,
but it might not, im not sure, try it for yourself!
Source 1
Source 2
OpenBSD
There is really not much to say here,
after flashing the seabios_dell9020sff_nri_12mb_libgfxinit_txtmode.rom
rom, OpenBSD should just boot, if you are using Libreboot 25.06 there should be
no issues with your hdd/ssd not being detected in the OS. Full disk encryption
should also just work without issues booting. If you use the grub rom,
you may not be able to boot OpenBSD as easily as seabios. After all this
just install OpenBSD as you usually would.